i.MX53 SODIMM PC Loading bootloader
This page shown the steps how to initiate On-Chip Debugging and load bootloader into i.MX53 SODIMM PC - Development kit.
JTAG Debugger and Programmer Installation
- Connect JTAG Cable to USB port on the computer. JTAG device should be automatically recognized and prepared for usage.
- Download OpenOCD v0.6.0 software
- Unzip the files
Running Open On-Chip Debugger
Locate the folder where the software has been unpacked. Run OpenOCD utility in command line (by using Total Commander or Windows Command Prompt):
openocd -f vmx53w.cfg
Debugging session is opened and running:
600px
Connecting to Open On-Chip Debugger session
Using Windows Telnet Client
Click on Start/Run (or press Windows key + R), and open the Telnet session using 4444 port:
telnet localhost 4444
Telnet session is active and ready for use:
600px
Using terminal emulator
To open Telnet service using TeraTerm program, click on File/New Connection, check TCP/IP and type 4444 into TCP port# field. IP adrress to connect to is localhost (127.0.0.1):
600px
TeraTerm session is active and ready for use:
600px
Establishing serial connection
Open TeraTerm program, click on File/New Connection, check Serial and choose the port which was assigned to the JTAG device:
600px
A successful connection is established only if the following settings are applied (115200, 8n1):
600px
Loading bootloader
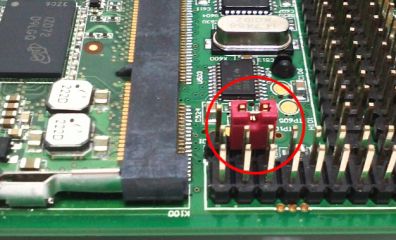
In order to disable the default direct boot, H902 jumper (BOOTMODE) must be placed between pins 1 and 2. This enables the serial boot and loading files over Telnet service.
Direct Boot (Boot from E-Fuses) is selected again when BOOTMODE jumper pins 2 and 3 are shortened.
| Serial Boot | Direct Boot (Boot from E-Fuses) |

|

|
| Vertical polarization | Horizontal polarization | |
396px |
396px |