Difference between revisions of "i.MX25 SODIMM PC Loading bootloader"
| Line 48: | Line 48: | ||
== Boot mode options == | == Boot mode options == | ||
H902 jumper (BOOTMODE) allows to choose different bootloader sources: | H902 jumper (BOOTMODE) allows to choose different bootloader sources: | ||
| − | * ''' | + | * '''Direct boot''' is enabled when a link is placed between pins 1 and 2 by default |
| − | * ''' | + | * '''Serial Boot''' (Internal boot) is selected when pins 2 and 3 are shortened. |
{|style="text-align:center;" | {|style="text-align:center;" | ||
| − | |[[image:i. | + | |[[image:i.MX25 SODIMM PC-Development Kit-Direct boot mode.jpg|296px]] |
| − | |[[image:i. | + | |[[image:i.MX25 SODIMM PC-Development Kit-Serial boot mode.jpg|296px]] |
|- | |- | ||
|Direct Boot | |Direct Boot | ||
| Line 59: | Line 59: | ||
|} | |} | ||
<br /> | <br /> | ||
| − | '''''Important:''''' | + | '''''Important:''''' No boot mode changes are required during firmware loading. |
== Loading bootloader == | == Loading bootloader == | ||
Revision as of 23:19, 12 April 2021
This page shows the steps how to initiate On-Chip Debugging and load bootloader into i.MX25 SODIMM PC - Development kit.
JTAG Debugger and Programmer Installation
- Connect JTAG Cable to USB port on a computer. JTAG device should be automatically recognized and prepared for usage.
- Download OpenOCD v0.6.0 software
- Unzip the files
Running Open On-Chip Debugger
Locate the folder where the software was unpacked. Run OpenOCD utility in command line (by using Total Commander or Windows Command Prompt):
openocd.exe -f vmx25w.cfg
Debugging session is opened and running:
600px
Connecting to Open On-Chip Debugger session
Using Windows Telnet Client
Click on Start/Run (or press Windows key + R), and open the Telnet session using 4444 port:
telnet localhost 4444
Telnet session is active and ready for use:
600px
Using terminal emulator
To open Telnet service using TeraTerm program, click on File/New Connection, select TCP/IP option and type 4444 into TCP port# field. The IP address to connect to is localhost (127.0.0.1):
400px
TeraTerm session is running and ready for use:
600px
Establishing serial connection
Open TeraTerm program, click on File/New Connection, choose Serial and select the port which was assigned to the serial console:
400px
A successful connection is created only if the following serial port settings are applied (115200, 8n1):
600px
Boot mode options
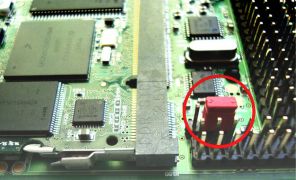
H902 jumper (BOOTMODE) allows to choose different bootloader sources:
- Direct boot is enabled when a link is placed between pins 1 and 2 by default
- Serial Boot (Internal boot) is selected when pins 2 and 3 are shortened.

|

|
| Direct Boot | Serial Boot |
Important: No boot mode changes are required during firmware loading.
Loading bootloader
The following commands need to be placed inside Localhost Telnet session and executed one by one. Console logs are included for comparison:
reset_halt
vmx51_init
boot
Barebox was loaded into the i.MX25 SODIMM PC Module SRAM and executed:
600px
As this fresh Barebox is stored in SRAM only at this point, switching the module off causes the bootloader to be erased. To store the new Barebox and use it automatically after power on, image flashing is required. Follow this section to do so.