Difference between revisions of "i.MX25 SODIMM PC Windows CE"
| Line 32: | Line 32: | ||
== Configuring Advanced ToolKit feature == | == Configuring Advanced ToolKit feature == | ||
Start Advanced ToolKit program. Upon start configure the setting following this example:<br /> | Start Advanced ToolKit program. Upon start configure the setting following this example:<br /> | ||
| − | [[image:i.MX25_SODIMM_PC-WinCE-Configuring_ATK.jpg| | + | [[image:i.MX25_SODIMM_PC-WinCE-Configuring_ATK.jpg|600px]] |
<br /> | <br /> | ||
Required configurations required for i.MX25 SODIMM PC - Development kit: | Required configurations required for i.MX25 SODIMM PC - Development kit: | ||
Revision as of 12:52, 19 April 2021
This page guides though Windows CE loading and flashing procedure. Advanced ToolKit Platform is used during this process while running on Windows XP operating system. Newer version of Windows OP (including Windows 10) are supported utilizing CEDownloader program.
Preparing the host computer
Installing Advanced ToolKit
The Advanced ToolKit package can be obtained from download section. Unpack and install the executable file FSL_ATK_TOOL_WINS_STD_INSTALL_1_70.exe. This package also contains detailed documentation concerning the program usage.
PC reboot after installation is not required. Open and run the program.
Initilization of USB driver
During the install procedure, the USB drivers are installed automatically. To verify that the driver is ready for usage, plug in the board using USB mini cable and navigate to the Device Manager. When the hardware is attached to the computer properly, device named Jungo appears in the list:
800px
Note: In case the USB driver was not installed successfully, it can be loaded manually by starting wd_install_4NT.bat batch file located in <TOOL_INSTALL_PATH>/windriver/ directory. The same folder also contains bat file wd_uninstall_4NT.bat for uninstalling the driver. Older version of the USB driver can also be uninstalled using the toolkit utility.
Preparing the development board
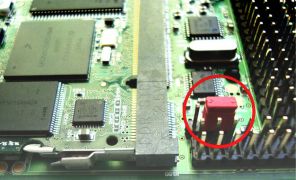
Serial Boot option selected by H902 (BOOTMODE) jumper is required. To do so use a link to connect pins 2 and 3:

|

|
| Serial Boot | Direct Boot |
At this moment i.MX25 SODIMM PC - Development kit will not boot from the stored binary but wait in the serial mode. Connect the board and the host computer with USB mini cable. Power on the board.
Configuring Advanced ToolKit feature
Start Advanced ToolKit program. Upon start configure the setting following this example:
600px
Required configurations required for i.MX25 SODIMM PC - Development kit:
- Select i.MX25_TO1.1 as the CPU option
- Choose Custom Initial File for memory initiation. Files prepared for i.MX25 SODIMM PC Module are located within the feature package
- Select USB option as the host communication channel
- Leave 'Bypass the settings' unchecked otherwise the actual setting will be ignored