Difference between revisions of "iMX6 Rex Production"
| (8 intermediate revisions by the same user not shown) | |||
| Line 1: | Line 1: | ||
| − | [[Category:iMX6 Rex Development | + | [[Category:iMX6 Rex Development Kit]] |
<!-- --> | <!-- --> | ||
<div style="float:right">__TOC__</div> | <div style="float:right">__TOC__</div> | ||
| Line 6: | Line 6: | ||
This procedure is intended for manufacturing and virgin modules only and should be never applied for shipped iMX6 Rex Modules.<br /><br /> | This procedure is intended for manufacturing and virgin modules only and should be never applied for shipped iMX6 Rex Modules.<br /><br /> | ||
| − | '''''BE AWARE THAT E-FUSES PROGRAMMING IS A NON REVERSAL PROCESS! WARRANTY CLAIM CAUSED BY IMPROPER E-FUSES PROGRAMMING WILL NOT BE ACCEPTED!''''' | + | '''''BE AWARE THAT E-FUSES PROGRAMMING IS A NON REVERSAL PROCESS!<br />WARRANTY CLAIM CAUSED BY IMPROPER E-FUSES PROGRAMMING WILL NOT BE ACCEPTED!''''' |
== Information == | == Information == | ||
| Line 13: | Line 13: | ||
== Description == | == Description == | ||
Production procedure consists of following steps: | Production procedure consists of following steps: | ||
| − | * Short BOOT_MODE (JP2) jumper on iMX6 Rex Base Board | + | * Short BOOT_MODE (JP2) jumper on iMX6 Rex Base Board |
* Connect RS-232 port to serial terminal (Settings: 115200 8n1) | * Connect RS-232 port to serial terminal (Settings: 115200 8n1) | ||
* Connect USB_OTG port to host PC utilising microUSB-USB cable | * Connect USB_OTG port to host PC utilising microUSB-USB cable | ||
| − | * Power on iMX6 Rex Development | + | * Power on iMX6 Rex Development Kit |
* Execute Manufacturing toolkit at host PC | * Execute Manufacturing toolkit at host PC | ||
* Press Start button (iMX6 Rex board will boot firmware loaded over USB) | * Press Start button (iMX6 Rex board will boot firmware loaded over USB) | ||
| − | * Wait until firmware ( | + | * Wait until firmware (U-Boot) is booted (serial terminal) |
* Burn eFuses over serial terminal | * Burn eFuses over serial terminal | ||
* Remove BOOT_MODE jumper | * Remove BOOT_MODE jumper | ||
| − | * Power off iMX6 Rex Development | + | * Power off iMX6 Rex Development Kit |
== Requirements == | == Requirements == | ||
| Line 28: | Line 28: | ||
* UART cable | * UART cable | ||
* 12V Power supply | * 12V Power supply | ||
| − | * iMX6 Rex Development | + | * iMX6 Rex Development Kit (with USB0 routed modification: USB OTG connector in use R62, R65 assembled |
| − | * Windows PC equipped with [http://downloads.voipac.com/index.php?p= | + | * Windows PC equipped with [http://downloads.voipac.com/index.php?p=iMX6_TinyRex_Development_Kit/tools&dl=mfgtools-Imx6Rex.zip MfgTool] feature and serial line terminal |
== Configurations == | == Configurations == | ||
| Line 40: | Line 40: | ||
== Procedure == | == Procedure == | ||
Select appropriate BAT file and start the bootloader transfer over USB OTG interface:<br /> | Select appropriate BAT file and start the bootloader transfer over USB OTG interface:<br /> | ||
| − | [[image: | + | [[image:iMX6_Rex_Development_Kit-MfgTool_production_start.png|580px]]<br /><br /> |
Wait until the process is finished:<br /> | Wait until the process is finished:<br /> | ||
| − | [[image: | + | [[image:iMX6_Rex_Development_Kit-MfgTool_production_success.png|430px]]<br /><br /> |
The board boots from the loaded firmware:<br /> | The board boots from the loaded firmware:<br /> | ||
| − | [[image: | + | [[image:iMX6_Rex_Development_Kit-Serial_console_production.png|580px]]<br /><br /> |
== E-Fuses == | == E-Fuses == | ||
| Line 91: | Line 91: | ||
</syntaxhighlight> | </syntaxhighlight> | ||
| − | == | + | == Configuration testing == |
| − | To check | + | To check that E-Fuses were setup correctly, test procedure consists of following steps: |
* Ensure that BOOT_MODE jumper is not present | * Ensure that BOOT_MODE jumper is not present | ||
* Plug micro SD card with valid testing firmware (or plug SATA disk if SATA booting was selected) | * Plug micro SD card with valid testing firmware (or plug SATA disk if SATA booting was selected) | ||
| − | * Power on iMX6 Rex Development | + | * Power on iMX6 Rex Development Kit |
* On-module red LED must start flashing automatically (bootloader was executed and kernel loaded) | * On-module red LED must start flashing automatically (bootloader was executed and kernel loaded) | ||
| − | * Power off iMX6 Rex Development | + | * Power off iMX6 Rex Development Kit |
Latest revision as of 10:37, 24 April 2022
Disclaimer of caution
This procedure is intended for manufacturing and virgin modules only and should be never applied for shipped iMX6 Rex Modules.
BE AWARE THAT E-FUSES PROGRAMMING IS A NON REVERSAL PROCESS!
WARRANTY CLAIM CAUSED BY IMPROPER E-FUSES PROGRAMMING WILL NOT BE ACCEPTED!
Information
This procedure will enforce loading firmware from SPI3 port and will set a unique MAC address.
Description
Production procedure consists of following steps:
- Short BOOT_MODE (JP2) jumper on iMX6 Rex Base Board
- Connect RS-232 port to serial terminal (Settings: 115200 8n1)
- Connect USB_OTG port to host PC utilising microUSB-USB cable
- Power on iMX6 Rex Development Kit
- Execute Manufacturing toolkit at host PC
- Press Start button (iMX6 Rex board will boot firmware loaded over USB)
- Wait until firmware (U-Boot) is booted (serial terminal)
- Burn eFuses over serial terminal
- Remove BOOT_MODE jumper
- Power off iMX6 Rex Development Kit
Requirements
- microUSB-USB cable
- UART cable
- 12V Power supply
- iMX6 Rex Development Kit (with USB0 routed modification: USB OTG connector in use R62, R65 assembled
- Windows PC equipped with MfgTool feature and serial line terminal
Configurations
Production-Rex-basic.bat  # Production module i.mx6d  512MB
Production-Rex-pro.bat    # Production module i.mx6q  2GB
Production-Rex-ultra.bat  # Production module i.mx6qp 4GB
Procedure
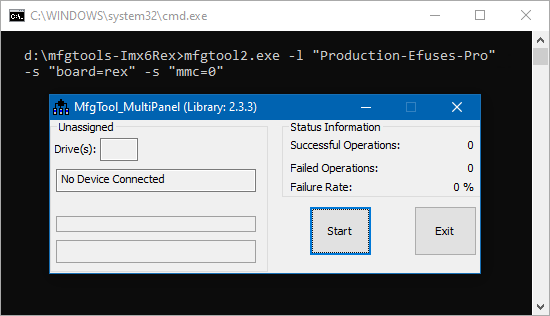
Select appropriate BAT file and start the bootloader transfer over USB OTG interface:

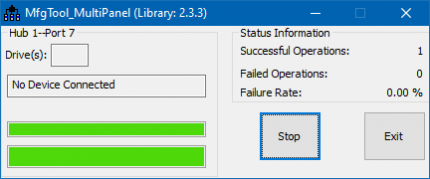
Wait until the process is finished:

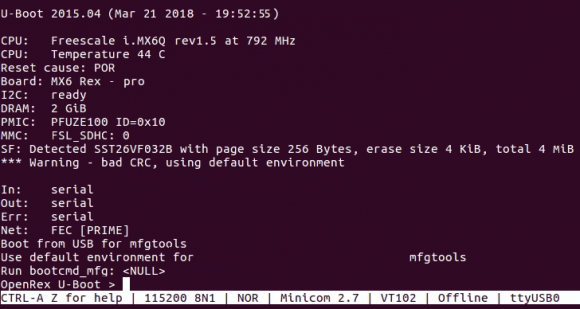
The board boots from the loaded firmware:

E-Fuses
This operation is not reversible and should be executed carefully! The iMX6 Rex Module must be replaced in the case of error.
Boot From SPI3
fuse prog 0 5 0x2A000030
fuse prog 0 6 0x00000010
Boot From SATA
fuse prog 0 5 0x00001020
fuse prog 0 6 0x00000010
MAC Address
For example address 00:0D:15:00:D1:75 is used:
fuse prog 4 3 0x000d
fuse prog 4 2 0x1500d175
U-Boot over TFTP
Rex U-Boot > setenv ethaddr 00:01:02:03:04:05
Rex U-Boot > setenv ipaddr 192.168.1.50
Rex U-Boot > setenv serverip 192.168.1.1
Rex U-Boot > mw.b 0x10800000 0xFF 0x80000
Rex U-Boot > tftp 0x10800000 imx6/u-boot-imx6-rexultra.imx
Using FEC device
TFTP from server 192.168.1.1; our IP address is 192.168.1.50
Filename 'imx6/u-boot-imx6-rexultra.imx'.
Load address: 0x10800000
Loading: #######################
         2.6 MiB/s
done
Bytes transferred = 334848 (51c00 hex)
Rex U-Boot > if sf probe 2:2; then sf erase 0x0 0x80000;sf write 0x10800000 0x400 0x7fc00; fi
SF: Detected SST25VF032B with page size 256 Bytes, erase size 4 KiB, total 4 MiB
SF: 524288 bytes @ 0x0 Erased: OK
SF: 523264 bytes @ 0x400 Written: OK
Configuration testing
To check that E-Fuses were setup correctly, test procedure consists of following steps:
- Ensure that BOOT_MODE jumper is not present
- Plug micro SD card with valid testing firmware (or plug SATA disk if SATA booting was selected)
- Power on iMX6 Rex Development Kit
- On-module red LED must start flashing automatically (bootloader was executed and kernel loaded)
- Power off iMX6 Rex Development Kit